项目公共组件代码

弹出框标题

				<Text
                  style={{
                    marginTop: 20,
                    marginBottom: 5,
                    fontSize: 20,
                    textAlign: 'center',
                    fontWeight: 'bold',
                    color: 'black',
                  }}>
                  {data.language.CROUPLIST_CLASS_MEMBERS}
                </Text>

可以复用的公共体

import React, {useContext, useEffect, useState} from 'react';
import {
  View,
  Text,
  SafeAreaView,
  Dimensions,
  TouchableOpacity,
  StyleSheet,
  Image,
} from 'react-native';
import {Button} from 'react-native-paper';
import {useSafeAreaInsets} from 'react-native-safe-area-context';
import {
  deviceList,
} from '../../../api/index';
import Store from '../../../stores/index';
import theme from '../../../styles/theme.json';
const {width, height} = Dimensions.get('window');

const BleExample = ({route, navigation}) => {
  const insets = useSafeAreaInsets();
  const [fullScreenHeight, setFullScreenHeight] = useState(height);
  const {data} = useContext(Store);

  useEffect(() => {
    // 计算全屏高度,包括刘海区域
    setFullScreenHeight(height - insets.top);
  }, [insets]);
  return (
    <SafeAreaView
      style={{
        backgroundColor: '#FFFFFF',
        width: width,
        height: height,
      }}>
      <View style={[styles.linearGradient, {height: fullScreenHeight}]}>
        <View style={styles.container}>
          <View style={[styles.titleItem1]}>
            <TouchableOpacity
              onPress={() => {
                navigation.goBack();
              }}>
              <Image
                source={require('../../../static/image/img_arrow-back.png')}
                style={{height: 40, width: 40}}
              />
            </TouchableOpacity>
          </View>
          <View style={[styles.titleItem]}>
            <Text
              style={{
                textAlign: 'left',
                fontSize: 20,
                fontWeight: 'bold',
                color: '#000000',
              }}>
              {data.language.DEVICE_TITLE_MYDEVICE}
            </Text>
          </View>
        </View>
          <View
            style={{
              flex: 1,
              flexDirection: 'column',
              height: height,
              justifyContent: 'space-between',
              paddingBottom: 30,
            }}>
            <View
              style={{
                flexDirection: 'column',
                alignItems: 'center',
                height: '80%',
              }}>
                
            </View>
            <View
              style={[
                {
                  flexDirection: 'row',
                  justifyContent: 'center',
                  alignItems: 'center',
                },
              ]}>
              <Button
                mode="contained"
                textColor={theme.REGIST_BTN_COLOR}
                buttonColor={theme.LOGIN_BTN_COLOR}
                style={styles.Account}
                contentStyle={{height: 50}}
                labelStyle={{fontSize: 20}}
                onPress={() => {
                  navigation.navigate('AddManageMent');
                }}>
                {data.language.DEVICE_BTN_ADD}
              </Button>
            </View>
          </View>
      </View>
    </SafeAreaView>
  );
};

export default BleExample;

const styles = StyleSheet.create({
  linearGradient: {
    paddingTop: 20,
    height: height,
  },
  container: {
    width: width,
    height: height / 15,
    position: 'relative',
  },
  titleItem1: {
    position: 'absolute',
    width: width,
    height: height / 15,
    flexDirection: 'row',
    alignItems: 'center',
    zIndex: 1,
  },
  titleItem: {
    position: 'absolute',
    width: width,
    height: height / 15,
    flexDirection: 'row',
    justifyContent: 'center',
    alignItems: 'center',
  },
  Account: {
    width: width / 1.1,
    borderRadius: 10,
  },
});

toast

import Toast from '../../../components/Toast';
	
  const [toastflag, setToastFlag] = useState(false); // 添加成功的toast
  const [title, setTitle] = useState(''); // 提示框内容

      setTitle('添加成功');
      setToastFlag(true);
      setTimeout(() => {
        setToastFlag(false);
        setTitle('');
      }, 2000);

<Toast toastflag={toastflag} title={title}></Toast>

公共的顶部

import {Dimensions, Image, SafeAreaView, StyleSheet, Text, TouchableOpacity, View} from 'react-native';
import Store from '../../../stores/index';
import { useContext } from 'react';
const {width,height} = Dimensions.get('window')
export default function Index({navigation,route}) {
  const {data} = useContext(Store);
  return (
    <SafeAreaView>
      <View style={styles.container}>
        <View style={[styles.titleItem1]}>
          <TouchableOpacity
            onPress={() => {
              navigation.goBack();
            }}>
            <Image
              source={require('../../../static/image/img_arrow-back.png')}
              style={{height: 40, width: 40}}
            />
          </TouchableOpacity>
        </View>
        <View style={[styles.titleItem]}>
          <Text
            style={{
              textAlign: 'left',
              fontSize: 20,
              fontWeight: 'bold',
              color: '#000000',
            }}>
            {data.language.DEVICESSN_TEXT_TITIE}
          </Text>
        </View>
        <View style={styles.titleItem3}>
          <TouchableOpacity
            onPress={() => {
              navigation.navigate('AddManageMent');
            }}>
            <Image
              style={{width: 50, height: 50}}
              source={require('../../../static/image/Device/addDevices.png')}></Image>
          </TouchableOpacity>
        </View>
      </View>
    </SafeAreaView>
  );
}

const styles = StyleSheet.create({
  container: {
    width: width,
    height: height / 15,
    position: 'relative',
    marginTop:20
  },
  titleItem1: {
    position: 'absolute',
    width: width,
    height: height / 15,
    flexDirection: 'row',
    alignItems: 'center',
    zIndex: 1,
    left: 5,
  },
  titleItem: {
    position: 'absolute',
    width: width,
    height: height / 15,
    flexDirection: 'row',
    justifyContent: 'center',
    alignItems: 'center',
  },
  titleItem3: {
    position: 'absolute',
    // width: width,
    right: 0,
    height: height / 15,
    flexDirection: 'row',
    justifyContent: 'flex-end',
    alignItems: 'center',
    zIndex: 2,
    right: 10,
  },
})

共用底部弹窗

import BottomModel from '../../../components/BottomModel';

  const [visible, setVisible] = useState(true); // 控制弹窗的显示隐藏

  const onClose = () => {
    setVisible(false);
  };
  // 确认按钮
  const endClass = () => {};

      {visible ? (
        <BottomModel visible={visible} LineBarFlag={true} onClose={onClose}>
          <View>
            <View style={[styles.bottommodulcontainer]}>
              <Text
                style={{
                  textAlign: 'center',
                  fontWeight: 'bold',
                  fontSize: 20,
                }}>
                {data.language.DEVICESUCCESS_MODELTITLE_REMINDER}
              </Text>
              <Text style={{fontSize: 16, marginTop: 20, lineHeight: 30}}>
                {data.language.DEVICESUCCESS_MODELTITLESUB_SUB}
              </Text>
            </View>
            <View style={[styles.BtnBottom]}>
              <Button
                mode="contained"
                textColor={theme.LOGIN_BTN_COLOR}
                buttonColor={theme.REGIST_BTN_COLOR}
                style={[
                  styles.Account2,
                  {borderWidth: 1, borderColor: theme.LOGIN_BTN_COLOR},
                ]}
                contentStyle={{height: 45}}
                labelStyle={{fontSize: 15}}
                onPress={onClose}>
                {data.language.DEVICESUCCESS_MODEL_LEFTBTN}
              </Button>
              <Button
                mode="contained"
                textColor={theme.REGIST_BTN_COLOR}
                buttonColor={theme.LOGIN_BTN_COLOR}
                style={[styles.Account2, {borderWidth: 1}]}
                contentStyle={{height: 45}}
                labelStyle={{fontSize: 15}}
                onPress={endClass}>
                {data.language.DEVICESUCCESS_MODEL_RIGHTBTN}
              </Button>
            </View>
          </View>
        </BottomModel>
      ) : null}


  bottommodulcontainer: {
    padding: 20,
  },
  BtnBottom: {
    flexDirection: 'row',
    alignItems: 'center',
    justifyContent: 'space-around',
    marginTop: 40,
  },
  Account2: {
    width: width / 2.5,
    borderRadius: 10,
  },
本文来自互联网用户投稿,该文观点仅代表作者本人,不代表本站立场。本站仅提供信息存储空间服务,不拥有所有权,不承担相关法律责任。如若转载,请注明出处:http://www.mfbz.cn/a/607666.html

如若内容造成侵权/违法违规/事实不符,请联系我们进行投诉反馈qq邮箱809451989@qq.com,一经查实,立即删除!

相关文章

点击短信链接唤起Android App实战

一.概述 在很多业务场景中,需要点击短信链接跳转到App的指定页面。在Android系统中,想要实现这个功能,可以通过DeepLink或AppLink实现。二.方案 2.1 DeepLink 2.1.1 方案效果 DeepLink是Android系统最基础、最普遍、最广泛的外部唤起App的方式,不受系统版本限制。当用户…

《21天学通C++》(第二十章)STL映射类(map和multimap)

为什么需要map和multimap&#xff1a; 1.查找高效&#xff1a; 映射类允许通过键快速查找对应的值&#xff0c;这对于需要频繁查找特定元素的场景非常适合。 2.自动排序&#xff1a; 会自动根据键的顺序对元素进行排序 3.多级映射&#xff1a; 映射类可以嵌套使用&#xff0c;创…

typescript类型基础

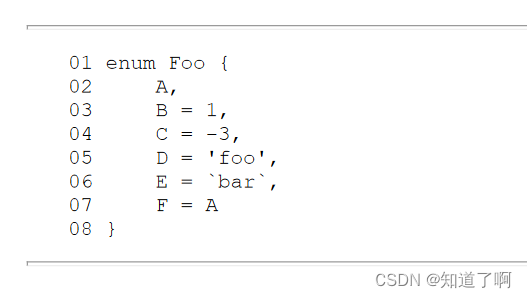
typescript类型基础 枚举类型 enum Season {Spring,Summer,Fall,Winter }数值型枚举 enum Direction {Up,Down,Left,Right } const direction:Direction Direction.up每个数值型枚举成员都表示一个具体的数字&#xff0c;如果在定义一个枚举的时候没有设置枚举成员的值&…

5款智能写作工具,为大家一键生成原创文案

好的文案是能吸引眼球、传递信息&#xff0c;但对于许多人来说&#xff0c;写出好文案是一项耗时耗力的任务。而随着一些智能写作工具的出现&#xff0c;它为我们带来了很大的便利&#xff0c;无论是写作文案还是写作其它的内容&#xff0c;智能写作工具都能轻松帮助我们完成。…

感谢有你 | FISCO BCOS 2024年度第一季度贡献者榜单

挥别春天&#xff0c;FISCO BCOS开源社区迎来了2024年第一季度的共建成果。FISCO BCOS秉承对区块链技术的信仰&#xff0c;汇聚超过5000家企业机构、10万余名个人成员共建共治共享&#xff0c;持续打造更加活跃更加繁荣的开源联盟链生态圈。 开启夏日&#xff0c;我们见证了社…

从源头把控风险:集团多主体合规管理实战技巧分享

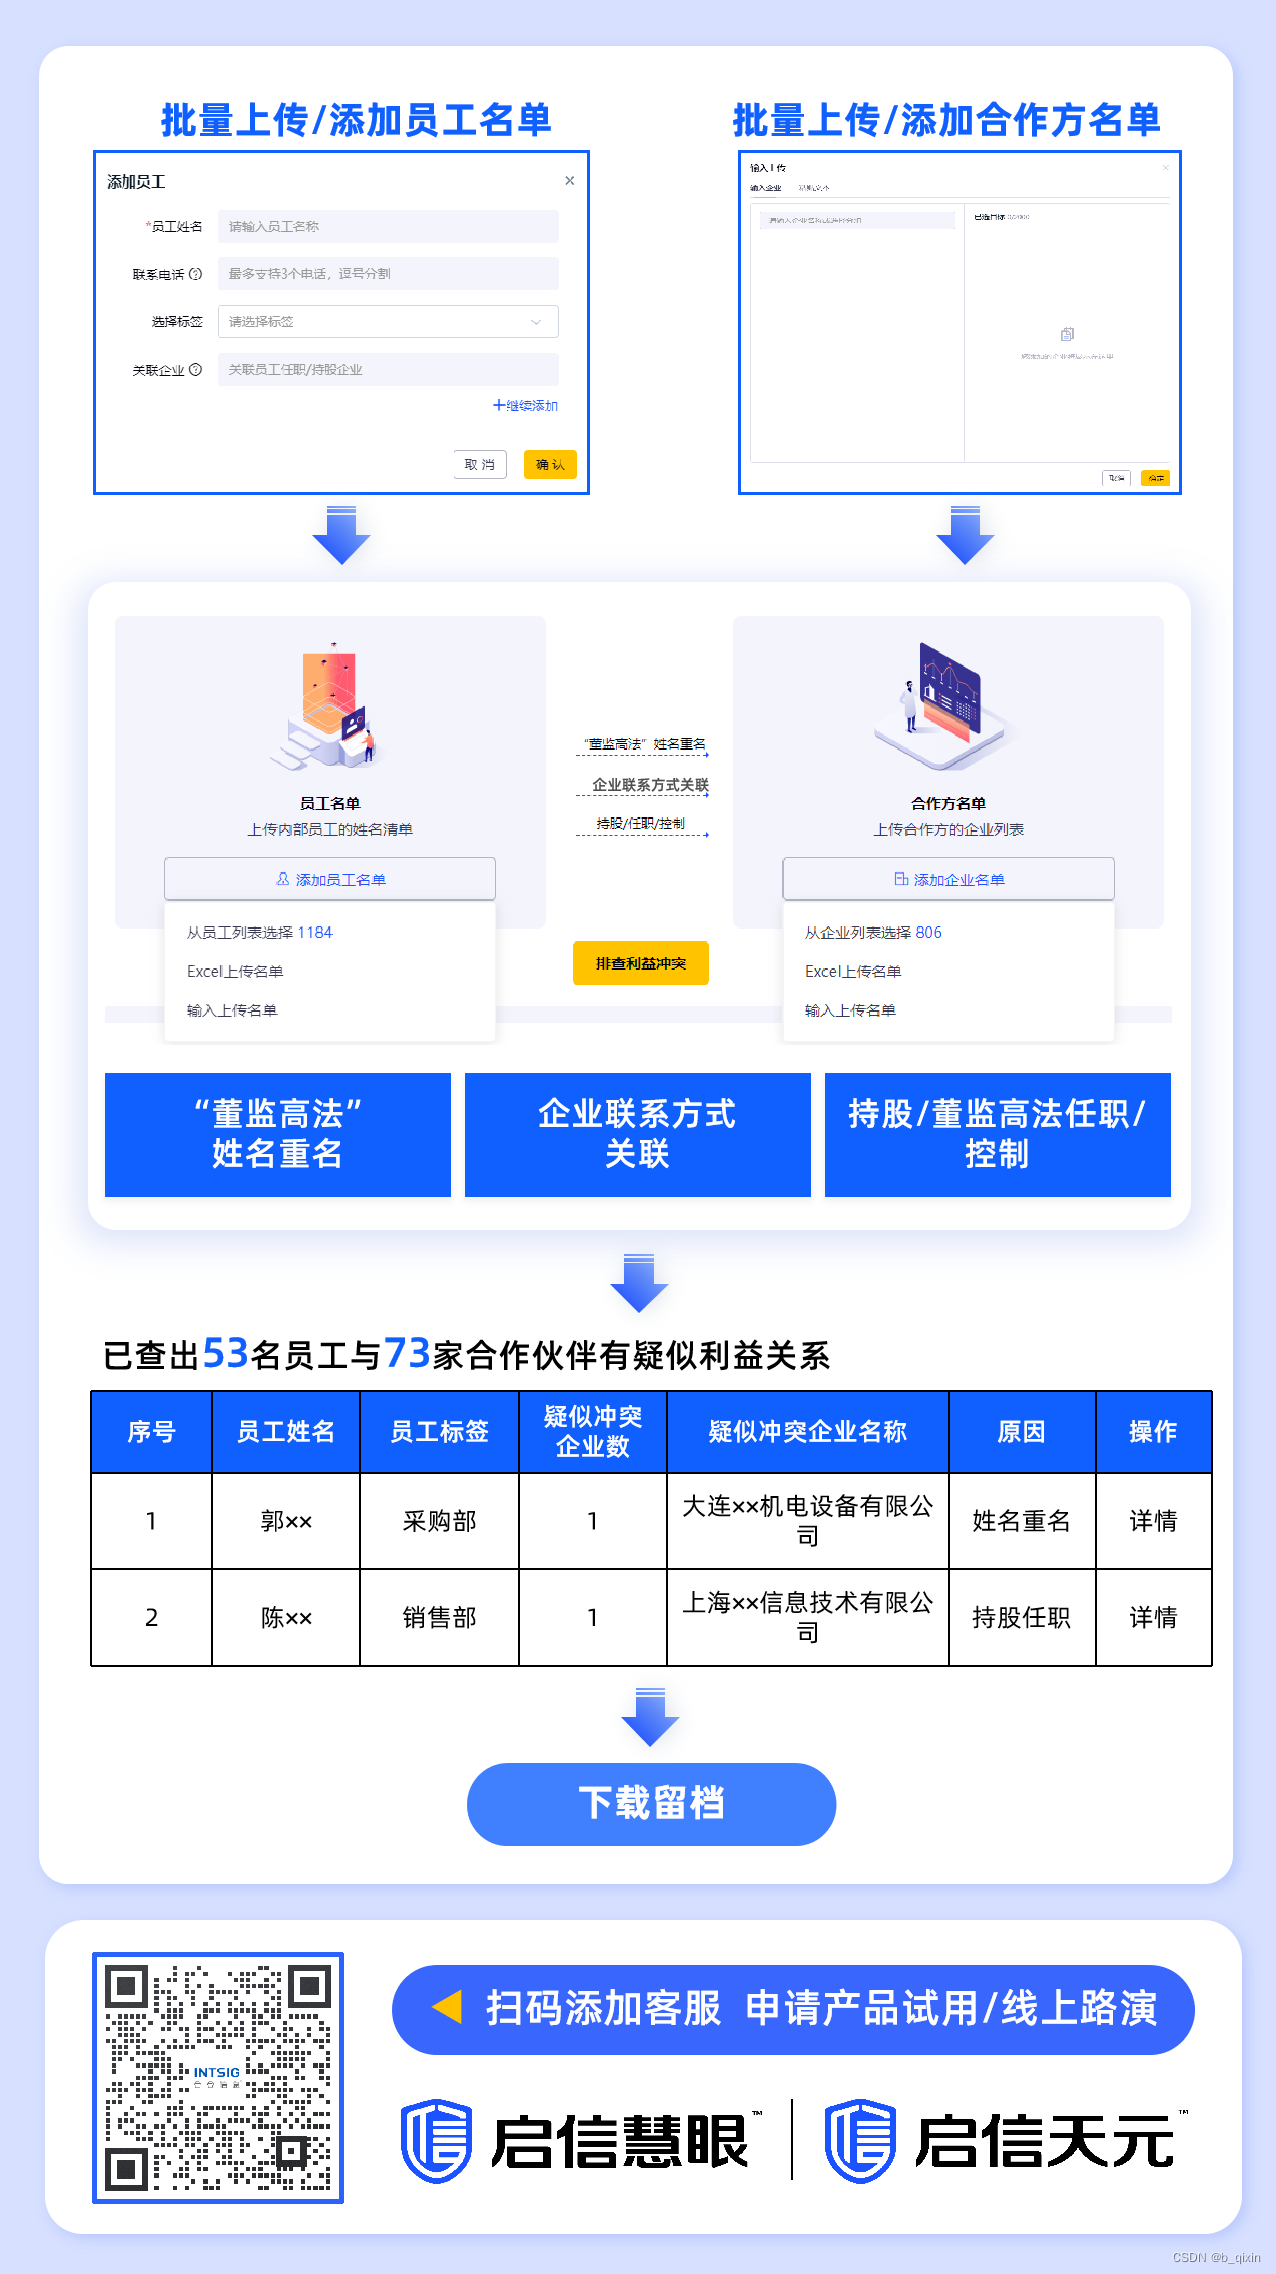
官.网地址&#xff1a;合合TextIn - 合合信息旗下OCR云服务产品 集团合规管理中&#xff0c;为了规避内外部利益冲突&#xff0c;需要对员工、供应商、经销商、客户、黑名单企业等多主体及其关联主体之间&#xff0c;进行多维度、多层级的关系挖掘与排查&#xff0c;避免利益…

MybatisPlus学习笔记

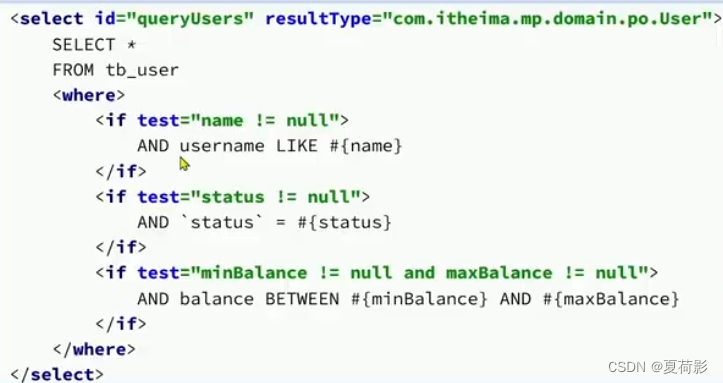
具体源码见&#xff1a; https://github.com/cug-lucifer/mp-demo/tree/master 快速入门 入门案例 需求&#xff1a; 新增用户功能根据id查询用户根据id批量查询用户根据id更新用户根据id删除用户 使用MybatisPlus的基本步骤 引入MybatisPlus依赖&#xff0c;代替Mybatis…

【题目】2023年全国职业院校技能大赛 GZ073 网络系统管理赛项赛题第4套B模块

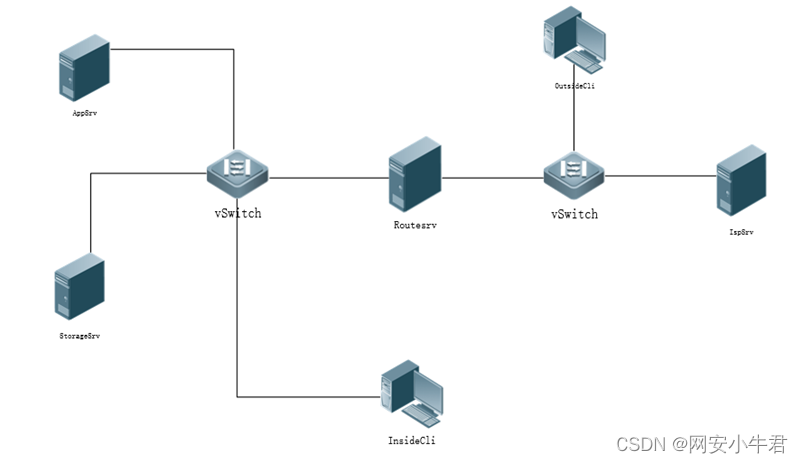
2023年全国职业院校技能大赛 GZ073网络系统管理赛项 赛题第4套 模块B&#xff1a;服务部署 信息安全管理与评估 网络系统管理 网络搭建与应用 云计算 软件测试 移动应用开发等多个赛项技术支持 任务书&#xff0c;赛题&#xff0c;解析等资料&#xff0c;知识点培训服务 添加…

HackBar 新手使用教程(入门)

啥是Hackbar&#xff1f; Hackbar是一个Firefox 的插件,它的功能类似于地址栏,但是它里面的数据不受服务器的相应触发的重定向等其它变化的影响。 有网址的载入于访问,联合查询,各种编码,数据加密功能。 这个Hackbar可以帮助你在测试SQL注入,XSS漏洞和网站的安全性,主要是帮助…

单单单单单の刁队列

在数据结构的学习中&#xff0c;队列是一种常用的线性数据结构&#xff0c;它遵循先进先出&#xff08;FIFO&#xff09;的原则。而单调队列是队列的一种变体&#xff0c;它在特定条件下保证了队列中的元素具有某种单调性质&#xff0c;例如单调递增或单调递减。单调队列在处理…

[Collection与数据结构] Map与Set(一):二叉搜索树与Map,Set的使用

&#x1f338;个人主页:https://blog.csdn.net/2301_80050796?spm1000.2115.3001.5343 &#x1f3f5;️热门专栏:&#x1f355; Collection与数据结构 (91平均质量分)https://blog.csdn.net/2301_80050796/category_12621348.html?spm1001.2014.3001.5482 &#x1f9c0;Java …

Baidu Comate智能编码助手

Baidu Comate智能编码助手 &#x1f388;1.Baidu Comate的简介&#x1f388;2.安装Baidu Comate&#x1f388;3.Baidu Comate实现功能&#x1f388;4.使用注释进行智能代码提示&#x1f388;5.结束语 &#x1f388;1.Baidu Comate的简介 根据官网的介绍&#xff0c;我们了解到B…

模型onnx转ncnn小记

前期准备 Netron 模型准备&#xff1a;onnx模型,这里使用模型face【det_10g.onnx】 大佬文档引用&#xff1a;手工优化ncnn模型结构 - 知乎 ncnn算子描述参考&#xff1a;ncnn 算子操作描述-CSDN博客 模型优化 安装 pip install onnx-simplifier 先把我要转的模型优化合…

全网最详细的Python自动化测试(unittest框架)

&#x1f525; 交流讨论&#xff1a;欢迎加入我们一起学习&#xff01; &#x1f525; 资源分享&#xff1a;耗时200小时精选的「软件测试」资料包 &#x1f525; 教程推荐&#xff1a;火遍全网的《软件测试》教程 &#x1f4e2;欢迎点赞 &#x1f44d; 收藏 ⭐留言 &#x1…

Web 功能以及源码讲解

Web 功能以及语言讲解 培训、环境、资料、考证 公众号&#xff1a;Geek极安云科 网络安全群&#xff1a;624032112 网络系统管理群&#xff1a;223627079 网络建设与运维群&#xff1a;870959784 移动应用开发群&#xff1a;548238632 短视频制作群&#xff1a; 744125867极…

【6D位姿估计】FoundationPose 跑通demo 训练记录

前言 本文记录在FoundationPose中&#xff0c;跑通基于CAD模型为输入的demo&#xff0c;输出位姿信息&#xff0c;可视化结果。 然后分享NeRF物体重建部分的训练&#xff0c;以及RGBD图为输入的demo。 1、搭建环境 方案1&#xff1a;基于docker镜像&#xff08;推荐&#xf…

电脑windows系统压缩解压软件-Bandizip

一、软件功能 Bandizip是一款功能强大的压缩和解压缩软件&#xff0c;具有快速拖放、高速压缩、多核心支持以及广泛的文件格式支持等特点。 Bandizip软件的功能主要包括&#xff1a; 1. 支持多种文件格式 Bandizip可以处理多种压缩文件格式&#xff0c;包括ZIP, 7Z, RAR, A…

Win10环境下yolov8快速配置与测试-详细

0.0 说明 参考黄家驹的Win10 环境下YOLO V8部署&#xff0c;遇到一些问题&#xff0c;并解决实现&#xff0c;记录如下: 斜线字体是原博客中的创作 0.1 参考链接 https://blog.csdn.net/m0_72734364/article/details/128865904 1 Windows10下yolov8 tensorrt模型加速部署 …

苍穹外卖Day06笔记

疯玩了一个月&#xff0c;效率好低&#xff0c;今天开始捡起来苍穹外卖~ 1. 为什么不需要单独引入HttpClient的dependency&#xff1f; 因为我们在sky-common的pom.xml中已经引入了aliyun-sdk-oss的依赖&#xff0c;而这个依赖低层就引入了httpclinet的依赖&#xff0c;根据依…

Centos7网络处理name or service not known

1、编辑->虚拟网络编辑器 2、查看本机的ip 3、 /etc/sysconfig/network-scripts/ 查看文件夹下面的 ifcfg-eth33 后面的33可能不一样 vi /etc/resolv.conf 编辑文件添加以下DNS nameserver 114.114.114.114 4、设置本机的网络 5、ping www.baidu.com 先重启…